
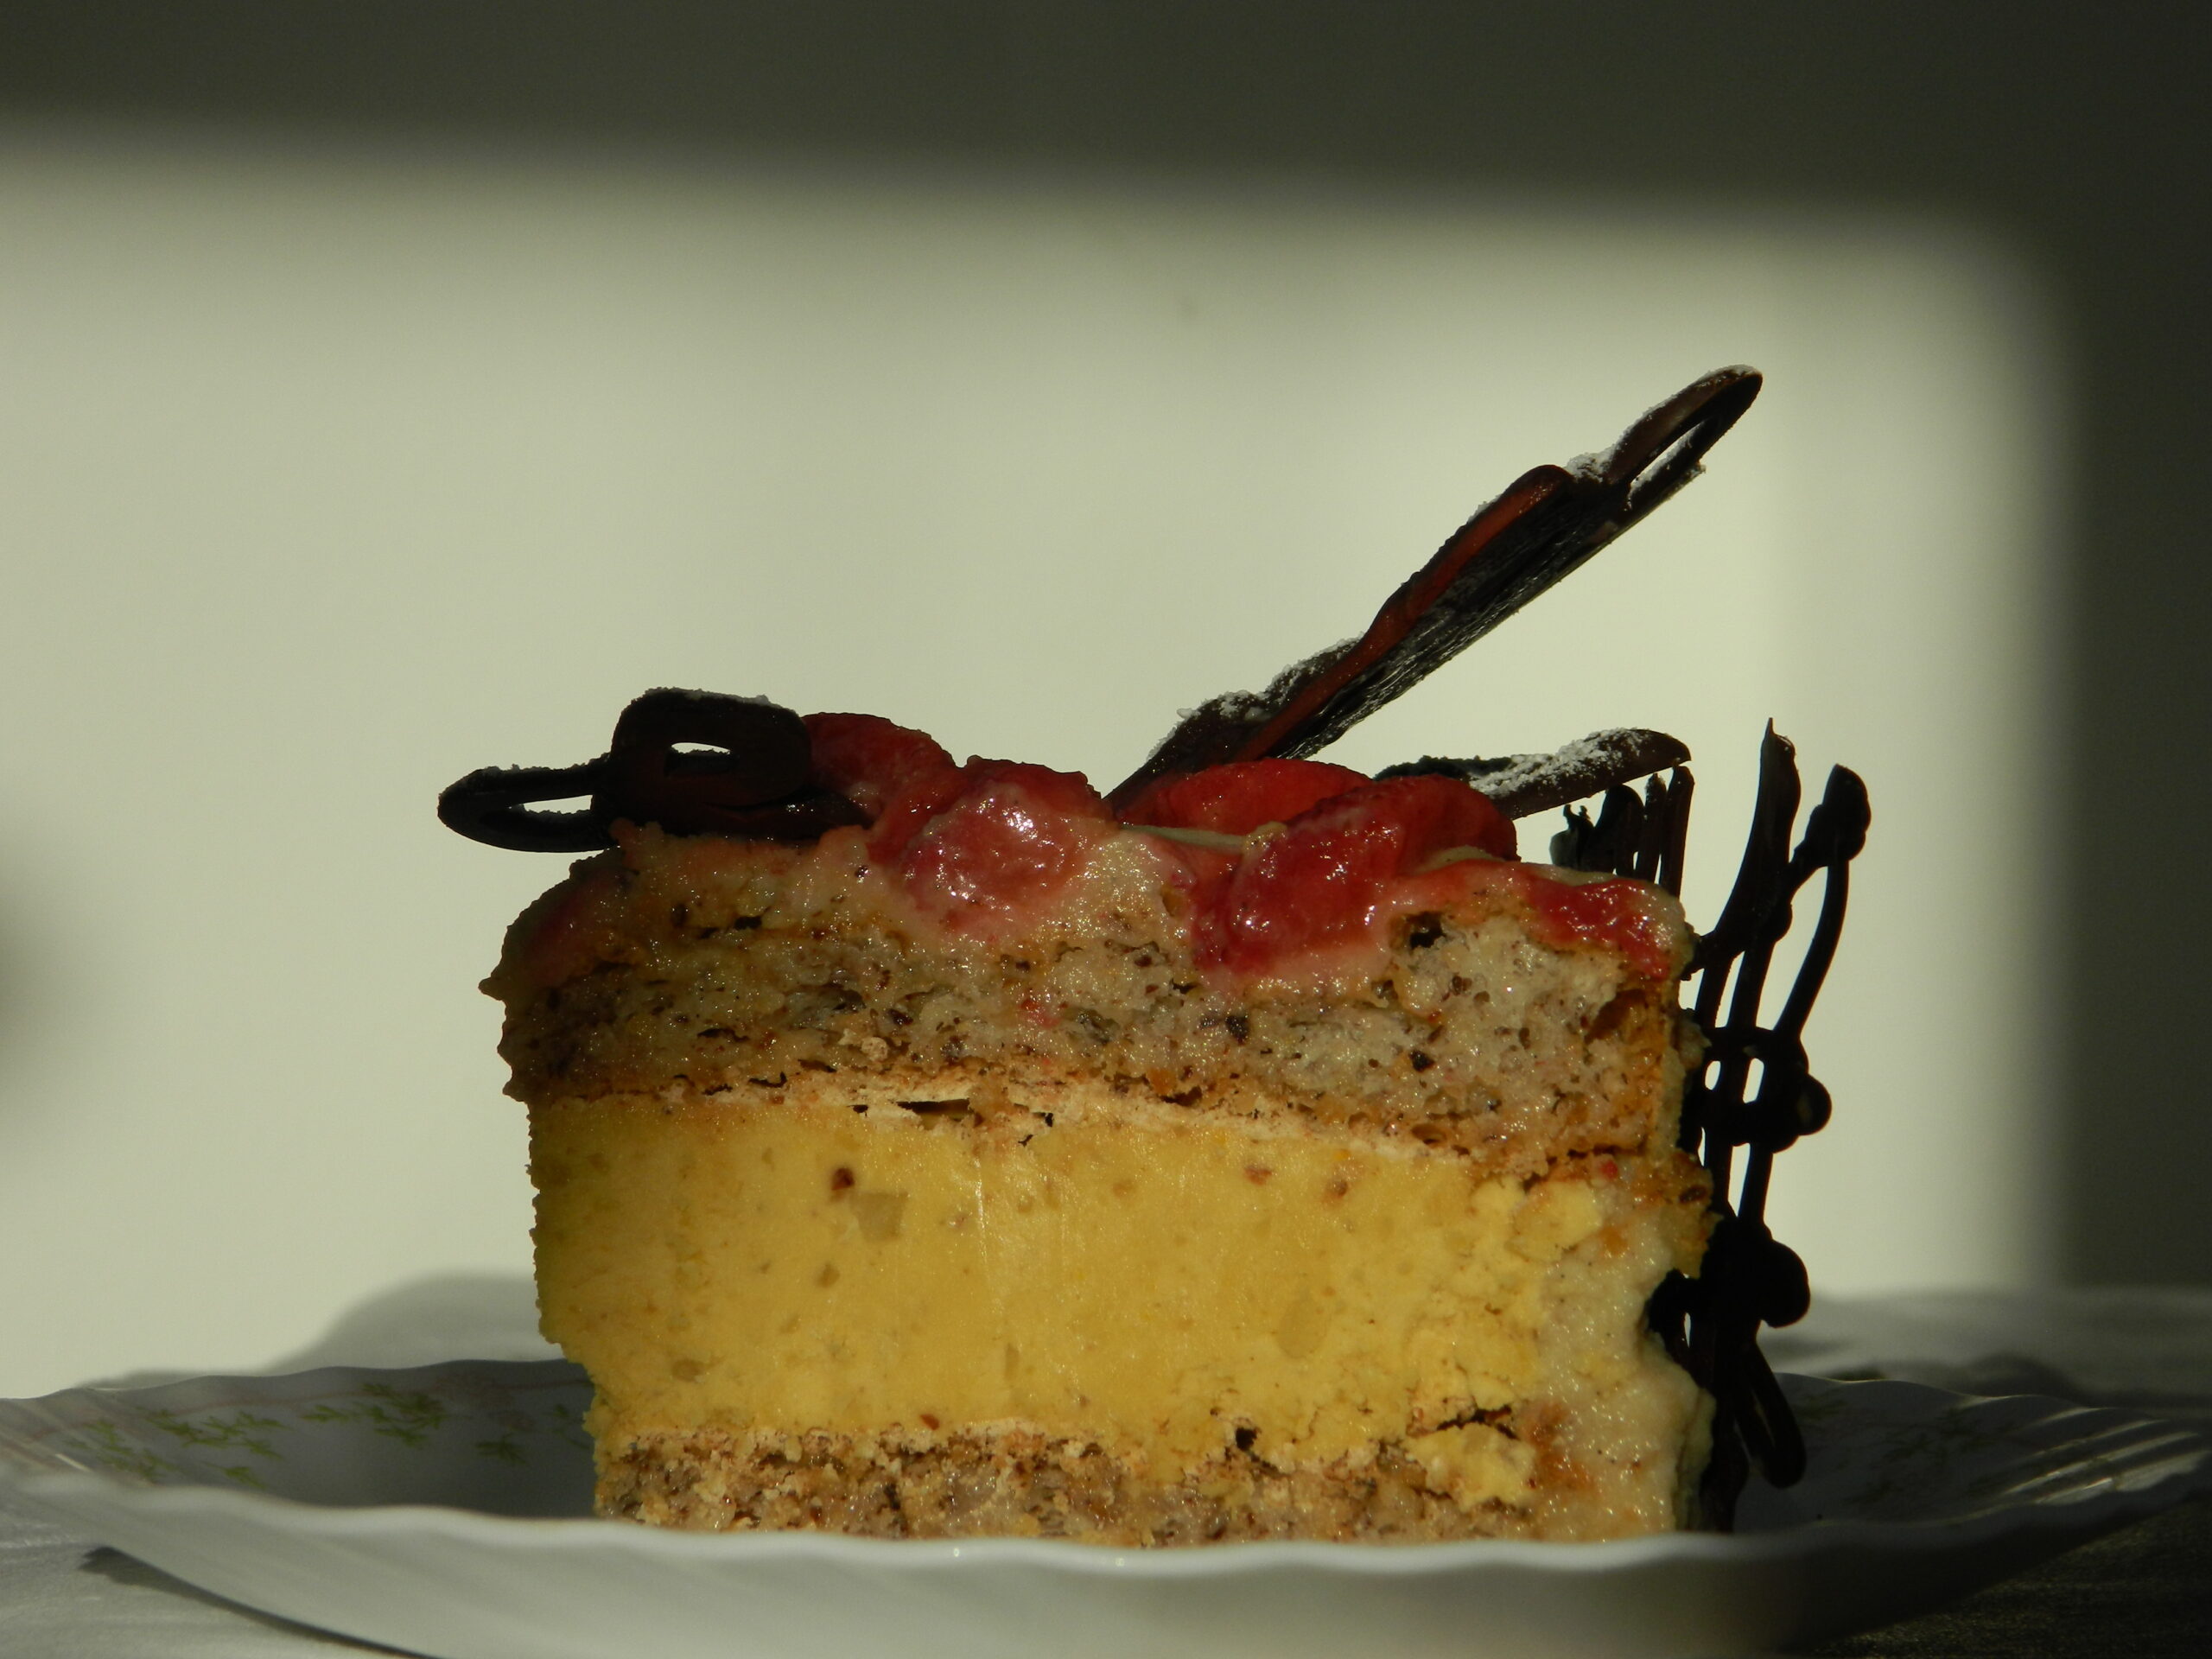
Luxurious hazelnut meringue, combined with chestnut buttercream and whipped cream, topped up by stunning glazed strawberries and chocolate. Can it get any more decadent? I present you the best way how to start your Carnival Season – Chestnut and Hazelnut Meringue.
The only thing you need is time to think and prepare well. Make the cake 1 day ahead, so it has time to chill out and connect all flavours together. Strawberries and Chocolate serve just before serving. This way it will look marvellous and taste even better. That is all there is to it.
Inspired by a world known classic Pavlova cake. I am particularly proud of this recipe. The greatness of it is that there is no waste. I implemented the whole eggs with a little twist of chestnuts, which brings any cake to the top. Let me reveal one secret. The Chestnut and Hazelnut Meringue is delicious on the next day, and even more the day after.
The Total Time: 5 hours + an overnight sit in the fridge
Shopping List
The Hazelnut Meringue:
135g ground hazelnuts
15g icing sugar, sifted
4 egg whites
300g caster sugar
1/2 vanilla pod, seeds extracted
1 teaspoon of vinegar
The Chestnut Buttercream:
100g of cane sugar
A splash of rum
250g of butter, soft
100g of chestnut purée (get inspired by my homemade Chestnut Purée Recipe)
The Chestnut Whipped Cream:
400ml of double cream
½ of vanilla pod, seeds extracted
A splash of rum (flavoured extract optional)
125g of quality chestnut purée
Glazed Strawberries:
2 handfuls of fresh strawberries, washed, cleaned and sliced
1 tablespoon of cane sugar
A knob of butter
200g of good quality chocolate (at least 60%), melted in a steam bath
Icing sugar to dust with
Instructions
One day ahead
Preheat the oven to 190 ºC.
The Hazelnut Meringue
First, place the hazelnuts and icing sugar in a vegetable blender and blend until smooth and homogenous texture.
Second, beat the egg whites into snow peaks. Whisk on a low-speed until incorporated well.
Then, gradually add caster sugar, few at a time. Continue whisking until the sugar is dissolved, for about 4 minutes.
At the end, a splash of vinegar and vanilla seeds. Give it the last good stir and done.
Third, mold the snow into the hazelnut mixture, a third at a time. Gently mix with a spatula. Continue until you get a smooth texture.
Divide the mixture between two spring forms (I used 22 cm) lined with a baking paper. By using a bit of meringue mix, you can stick the paper to the forms.
Bake in the oven for about 25 minutes until they rise and get golden on the top. Turn off the heat and let them cool down in the oven for about 1 hour.
The Chestnut Buttercream
Put the eggs yolks into a medium metal bowl.
Heat up around 50ml of water on high heat. Stir in 100g of cane sugar and a splash of rum. Let it cook until sugar is dissolved entirely.
Next, mold the liquid into the egg yolks. Mix as you go, and do it slowly. Let it sit for couple of minutes and then, place in a cold place to cool it down.
Once it is chilled out, soften the butter with a mixer for about 2 minutes until beautifully fluffy. Pour in the liquid, a third at a time and whisk. Continue until there is no liquid left and you have a homogenous texture.
Stir in the chestnut purée. Whisk until smooth. Taste.
Fill up the frosting bag with The Chestnut Buttercream and place in a glass.
Take your meringue gently out of the forms.
Place a bit of a cream on the bottom of your serving plate and flip the 1st meringue on a flat side.
Spiral The Chestnut Buttercream from out to the inside. Be generous and use it all.
Gently cover it with the flat side of the 2nd meringue. Press it softly and refrigerate for at 2 hours.
The Chestnut Whipped Cream
Start whipping the cream on low-speed. Add splash of rum and vanilla seeds. Just before you get the peaks, stop.
Stir in the chestnut purée and mix with a spatula.
If you are confident, you can continue whipping, but try not to overdo it.
My Culinary Tip
If you overwhip the cream even with other ingredients in it, do not panic.
My tip is to heat it all up in a steam bath and dissolve until it gets smooth. Do not forget to mix.
Then, take off the heat and place it in a cold place to cool it down entirely.
Afterwards you can just add a splash of fresh cream and whip it once again on a low-speed.
Now you have got 2 alternatives.
You can either pipe The Chestnut Whipped Cream over the cake, which is safer and easier, perhaps.
The second option is to mold the cream over the cake and gently smoothen it with a palette knife. It is a more elegant way, just make sure you don’t mold too much cream over the top of the meringue, so it won’t break. It may fall down, but it will be delicious anyway.
Refrigerate until next day.
The day of serving
The Glazed Strawberries
Heat up 1 tablespoon of cane sugar in a small frying pan on high heat.
Just before caramelization, stir in a knob of butter and strawberries. Lower the heat to medium.
Mix until it becomes a beautiful sticky texture. Take of the heat and let it cool down entirely.
My Chocolate Decoration Tips
First of all, You can walk through your flat and check for the inspiration. There is always something useful. Any drawn figures will do: check for the children’s books, magazines, drawings, paintings, etc. You can even tell your little ones to draw you something.
Next, you need to melt the chocolate in a steam bath. Mix well until you get a very smooth and easy texture to work with.
Take off the heat and transfer it into a cold bath for a couple of minutes.
Then, fill it up in a frosting bag.
Tip One:
Place a sheet of baking paper over your patterns and pipe the lines onto baking sheet. Always add a solid base of the decoration, so you can stick the figure on the cake easily.
Transfer the baking paper very gently into a cold place and let it dry completely.
Then, gently remove the figures from the paper. Done.
Tip Two:
Cut your desirable shapes out from a sheet of aluminum foil.
Take a sheet of baking paper and place aluminum foil on the top (the rest of the aluminum sheet and cuts in holes of it).
Create an avantgarde nest over each shape. Meaning: cross and zigzag all directions. Continue with all of them.
Next, gently remove the rest of aluminum sheet and keep the shapes on a baking paper.
Dry them out in a cold place. Then, remove from the aluminum paper. Done.
Presentation
No limits to imagination, this is the fun part right.
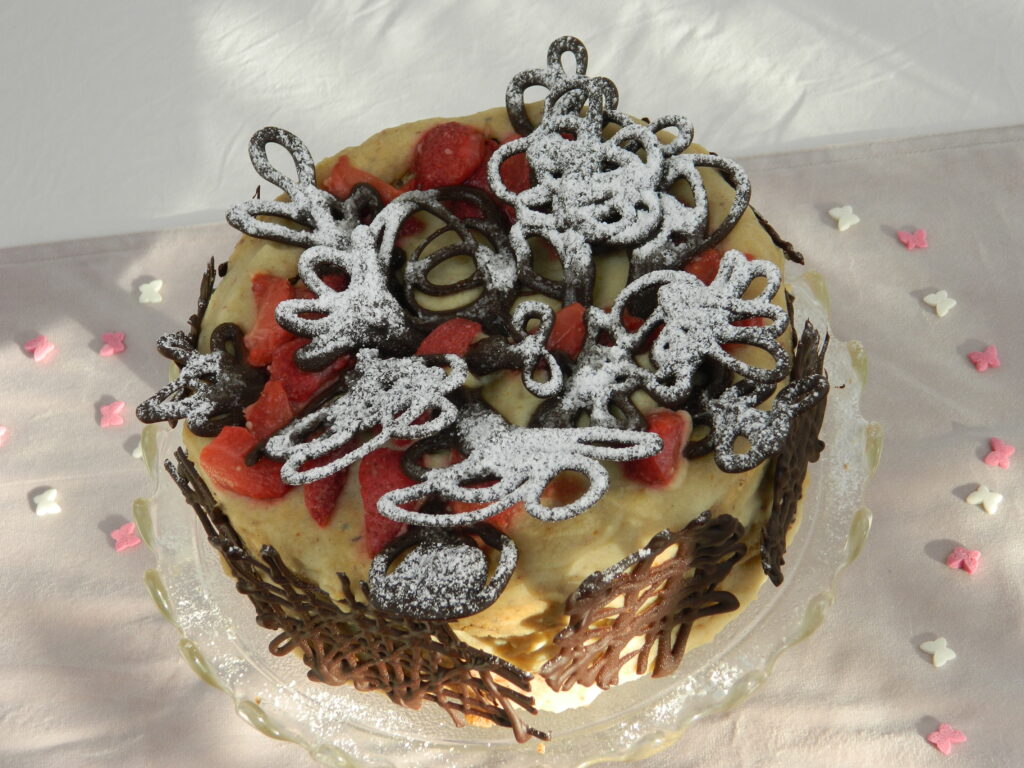
Take the cake out of the fridge and gently place The Glazed Strawberries over the top.
Place the chocolates whenever you like them to be.
You can place the nests on the sides of the cake. I put my little drawings on the top and dusted with some icing sugar.
Impress your beloved and have some feast. Yummy and yummy. Slice gently.
Makes 1 double cake of 22cm.